Showing posts with label SPAM. Show all posts

SAP Patch Manager (SPAM)

The SAP Patch Manager (SPAM) is the customer side of the Online Correction Support (OCS). Transaction SPAM lets you efficiently and easily apply SAP-provided patches to your system.

Depending on the system used or the configuration of your system, you must apply different Types of Patches. You can get the patches in the OSS, in SAPNet or on patch collection CDs.

SPAM runs at the SAP transaction level, so that a knowledge of the operating system is not required for handling the tool.

Calling SPAM

You can call Transaction SPAM in of the following 2 ways:

  • Choose Tools
  • ® ABAP Workbench ® Utilities ® Maintenance ® Patches.
  • Enter the transaction code
  • SPAM.

Scope of Functions

The SAP Patch Manager offers you the following functions:

  • Downloading patches

You can load the patches you need from the OSS, SAPNet and from patch collection CDs into your system.

  • Applying patches
  • Restart capability

When applying a patch to your system, SPAM follows a predefined sequence of steps.

If the patch application process terminates, it can be resumed at a later point in time. Processing restarts with the step that failed.

  • Creating backup copies

During processing, SPAM generates a backup of all affected customer objects before overwriting them. You can restore this backup if necessary.

  • Job scheduling

During processing, various actions (program generation) are performed. SPAM schedules these actions as event-driven background jobs with the ABAP program RDDIMPDP.

  • Displaying the patch status in your system

You can find the status of the patches in your system at any time using Transaction SPAM.

  • Upgrade integration

SPAM is integrated into the SAP upgrade procedure.

SPAM Steps

SPAM informs you of the status of the step currently being executed in the status bar. If you want to know which steps are executed for which scenario, run the program RSSPAM10.

The following list shows and explains the steps executed by SPAM in the order in which they are performed.

  1. PROLOGUE
  2. In this step, the system checks if you are authorized to apply patches.

  3. CHECK_REQUIREMENTS
  4. In this step, various requirements are checked for applying a patch, for example, the transport control program tp logging on to your system.

  5. DISASSEMBLE
  6. In this step, files from the corresponding EPS parcels are unpacked and stored in the directory.

  7. ADD_TO_BUFFER
  8. In this step, the patch queue is put into the transport buffer of your system.

  9. TEST_IMPORT
  10. In this step, the system checks if there are still objects in tasks that have not yet been released and are overwritten when the patch is applied.

  11. IMPORT_OBJECT_LIST
  12. In this step, the object lists for the patches in the queue are imported in the system.

  13. OBJECTS_LOCKED_?
  14. In this step, the system checks if there are still objects in tasks that have not yet been released and are overwritten when the patch is applied.

  15. SCHEDULE_RDDIMPDP
  16. In this step, the transport daemon (program RDDIMPDP) is scheduled.

  17. GENERATE_BACKUP
  18. In this step, a backup copy of the objects is generated that are overwritten when the patch is applied.

  19. ADDON_CONFLICTS_?
  20. In this step, the system checks if there are conflicts between objects in the patch queue and installed add-ons.

  21. SPDD_SPAU_CHECK
  22. In this step, the system checks if a modification adjustment is necessary (Transactions SPDD/SPAU).

  23. DDIC_IMPORT
  24. In this step, all the ABAP Dictionary objects of the ptach queue are imported.

  25. AUTO_MOD_SPDD
  26. In this step, the system checks if modifications to the ABAP Dictionary objects can be adjusted automatically.

  27. RUN_SPDD_?
  28. In this step, you are asked to adjust your modifications to the ABAP Dictionary objects by calling Transaction SPDD.

  29. IMPORT_PROPER
  30. In this step, all the Repository objects and table entries are imported. Then actions such as distribution, conversion, activation and generation occur.

  31. AUTO_MOD_SPAU
  32. In this step, the system checks if modifications can be adjusted automatically.

  33. RUN_SPAU_?
  34. In this step, you are asked to adjust your modifications to the Repository objects by calling Transaction SPAU.

  35. EPILOGUE

In this step, the patch application is ended. The system checks if the patch queue has been completely processed.

Checking Logs

Use

The function Log displays logs for SPAM steps that the transport control program tp uses.

After successfully applying the patch queue, check these logs each time.

Assigning the SPAM Steps to Log Files

Step

Log file

DISASSEMBLE_PATCH

Create cofile

TEST_IMPORT

Test Import

IMPORT_OBJECT_LIST

Command file import

DDIC-IMPORT

DD IMPORT

IMPORT_PROPER

DD Activation

Import

ADO IMPORT

Check versions

Method execution

Generate ABAP/screen

Procedure

To display the logs, choose Goto ® Log.

Return Code Meanings:

Return Code

Meaning

0 or 4

System information and warnings

Warnings are in general not critical for the system, but should be checked nevertheless, since sequence errors can occur in rare cases.

Greater than 4

Serious errors that must be corrected before you can successfully close the patch application.

SPAM Modification Adjustments

Use

If you have modified SAP objects, you must adjust these objects when importing them.

Requirements

SPAM prompts you to adjust your modifications.

Procedure

  1. Stop the patch application (
  2. F12). SPAM will resume at the step RUN_SPAU.
  3. So that your developers can perform the modification adjustment, in the
  4. Workbench Organizer create a request under which the tasks for the developers are put.
  5. Ask the developers to adjust the modifications for their objects. Developers can display a list of affected objects by choosing Extras
  6. ® Modif. adjustment from the initial screen of transaction SPAM. After the adjustment is completed, the developers must release their tasks and inform you. (You can perform the adjustment in each client).
  7. Call transaction SPAM. SPAM prompts you again to adjust the modifications. As this has already been done, ignore this prompt and choose Continue. SPAM completes processing and outputs the patch status.

Rules for the Patch Queue

  • If an FCS system is used, an FCS Final Delta Patch (FFDP) is listed at the beginning of the queue.
  • If it is missing from the queue, it cannot be defined. Instead, you receive an error message in which the name of the missing FFDP is given. You cannot apply a FFDP in a non-FCS system (official delivery status).
  • Hot Packages are put in sequential order in the queue.
  • If a previous Hot Package is missing from the queue, all the following patches (for example, Hot Packages or CRT) are not displayed in the queue.
  • Legal Change Patches (LCP) are put in sequential order in the queue.
  • If a previous LCP is missing from the queue, all the following patches (for example, LCP or CRT) are not displayed in the queue.
  • SAP Business Warehouse Patches (BWP) are put in sequential order in the queue.
  • You can only apply BWPs in SAP systems in which the SAP Business Information Warehouse (SAP BW) application component has been installed.
  • If you have installed add-ons and require Conflict Resolution Transports (CRTs), each CRT is put in the queue directly after the corresponding Hot Package (or LCP).
  • Note that you can only apply either Hot Packages or only LCPs or only BWPs according to the SAP system you have installed, or how your system is configured.

    The default configuration of an SAP system lets you apply Hot Packages. Applying LCPs is only necessary when using the Human Resources application component (SAP HR). However, your system must be configured for this according to Note 89089.

    If the SAP Business Information Warehouse (SAP BW) application component is installed on your system, you can only apply SAP Business Warehouse patches (BWP).

    The particular configuration is taken into account when building the queue so that you cannot choose any incorrect patches.

    Defining a Patch Queue

    Use

    The patch queue specifies which patches are applied in which order in your system by the SAP Patch Manager.

    Transaction SPAM ensures that only the patches appropriate for your system are displayed in the queue. Patches that are meant for another release or add-on do not appear in the queue, even if they were loaded in your R/3 System. For more information see Rules for the Patch Queue.

    If the queue is already completely defined (all patches are selected), this is then displayed; you cannot change the selection anymore. In the case where no patches have been selected, you must define the queue using the available patches.


    Before applying patches, you must define the patch queue.

    Requirements

    You have loaded the relevant patches into your R/3 System using SPAM.

    Procedure

    1. To define a patch queue, choose Display/define queue. The dialog box for the queue definition appears.
    2. From the list of patches, select the patches you want to apply.
    3. With the menu option Select all, you can apply all the patches at once. However, you can only choose several of the patches offered.

    4. Check the consistency of your selection by choosing Check selection.
    5. If your selection is not complete, it is automatically completed if the missing patches are available. The additional patches that have been included are highlighted in color.

      If the patches needed to complete the queue are missing, you will be informed about which ones these are. You can reduce the selection size until the queue is consistent, or you can close the dialog box and get the missing patches.

    6. If your selection is consistent, choose Confirm selection.
    7. This defines the patch queue and then you leave the dialog box.


    8. Apply the patches in the queue.

    Uploading a Patch

    Use

    Before you can apply patches, you must first upload the relevant patches. SAP provides patches:

    • In OSS
    • In SAPNet
    • On patch collection CDs

    Requirements

    • The Workbench Organizer and transport system must be set up correctly.
    • There must be enough space available in the transport directory (UNIX:
    • /usr/sap/trans).
    • You must have the relevant
    • authorizations for the SAP Patch Manager.
    • You must be logged onto Client 000.
    • You must call transaction SPAM.
    • You are using the newest SPAM version.

    Procedure

    Downloading Patches from OSS

    Before you download a patch from OSS, maintain the network parameters for logging on to the OSS. To do this, use Transaction OSS1.

    1. Request the desired patches in OSS.
    2. Load the patches from OSS into your R/3 System by choosing Patch ® Download.
    3. A list of patches is displayed. You can then select individual patches to download.
    4. The size of the uncompressed patches is displayed in bytes. You can use the size of the patch to estimate the download time.
    5. Using the status display, check if the download was successful.
    6. To return to the SPAM initial screen, choose Goto ® Back.

    7. Define the Patch Queue.

    Uploading Patches from SAPNet or from Patch Collection CDs

    Patches from SAPNet or from patch collection CDs are in a compressed format. You have to unpack these patches before proceeding with further processing.

    1. Load the patches from SAPNet or mount the relevant CD.
    2. Log on using the following user:

    Operating System

    User

    UNIX

    adm

    AS/400

    OFR

    Windows NT

    adm

    Switch to the following subdirectory in your system:

    Operating System

    Subdirectory

    UNIX and AS/400

    Trans

    Windows NT

    TRANS

    Unpack the archive containing the patches using the following command:

    Operating System

    Command

    UNIX

    CAR -xvf ///.CAR

    AS/400

    CAR '-xvf /QOPT///.CAR'

    Windows NT

    CAR -xvf :\\.CAR

    1. Put the unpacked patches in the EPS Inbox of the transport directory (UNIX:
    2. /usr/sap/trans/EPS/in).
    3. Now load the patches in your system by choosing Patch ® Upload.
    4. You see a list of the uploaded patches that are now known in the R/3 System with all of their attributes, and can be handled in the correct way by the SAP Patch Manager.
    5. To return to the SPAM initial screen, choose Back.

    6. Define the Patch Queue

    Importing SPAM Updates

    Use

    You will receive extensions and improvements of the SAP Patch Manager from the SPAM update. There is always one SPAM update for each maintenance level release that is correspondingly updated. You can find the version (creation date) in the short description, for example:

    SPAM update v. 13 May 1998 for R/3 4.0B

    A SPAM update appears first in the patch list of OSS, prior to earlier patches.


    Make sure you always have the newest version of SPAM before applying patches.

    Requirements

    You can only import a SPAM update successfully if there are no aborted patches in the system.

    A dialog box informs you if there are aborted patches. You then have two possibilities:

    1. First apply the complete patch queue and then the SPAM update.
    2. Reset the patch queue status, import the SPAM update first and then the patch queue. You can reset the patch queue status by choosing Extras ® Reset status ® Patch queue.

    Procedure

    1. Check if the SPAM update offered is newer than the one in your system. To check this, under Directory choose Applied patches and then choose Display.

    2. For technical reasons, a SPAM update is not displayed in the patch queue.

    3. To import the newest SPAM update, choose Patch ® SPAM update.

    SPAM updates are automatically confirmed after being successfully imported.

    Applying Patches using SPAM

    To apply all types of patches to your system, use Transaction SPAM, regardless of whether the patches come from OSS, SAPNet or from patch collection CDs.

    Requirements

    User:

    • You must have the relevant
    • authorization for the SAP Patch Manager.
    • You must be logged onto Client 000.
    • You must call transaction SPAM.

    Choose Tools ® ABAP Workbench ® Utilities ® Maintenance ® Patches, or enter the transaction code SPAM.

    The initial screen gives you an overview of the patch status in your system. The last patch applied is displayed with its status if it is available. If the patch application is incomplete, the last (terminated) step processed by SPAM is also displayed.

    System:

    • Check the correct function of the transport tools by choosing Utilities ® Check transport tools.
    • Ensure that enough space is available in the transport directory (UNIX:
    • /usr/sap/trans).
    • Use the newest SPAM update.

    Check if the SPAM update offered in OSS is newer than the one in your system. To determine which version is applied, under Directory choose Applied patches and then choose Display. To avoid problems when applying patches, we recommend you always first apply the newest SPAM update. Importing a SPAM update occurs in the same way as applying other patches.

    • You cannot have any incompletely applied patches in your system.
    To check this, under Directory choose Aborted patches and then choose Display. No patches should be displayed. Under the section Patch, the status should display a green traffic light. If this is not the case, look at the detailed status and log information of all patches found in the system.

    Settings for SPAM

    To go to the dialog box where you can make general settings for the SAP Patch Manager (SPAM), choose Extras ® Settings. These settings equally influence the behavior when you download and apply patches of different types. The SPAM updates are an exception, where certain settings are already fixed.

    You can set the following attributes:

    · Transmission monitor

    When you activate the Transmission monitor, you can monitor patches being downloaded from the OSS with a graphical monitor. Otherwise, the progress of the download is displayed in the status line.

    · Scenario

    When choosing the scenario, you determine which activities are to be performed when the patch is applied. The default scenario is used to apply patches completely; all steps are performed. The Test scenario lets you determine before the patch is actually applied, if a modification adjustment is required, or if conflicts will occur that should be resolved before applying the patch. In the Test scenario, data and objects are not imported into your SAP system.

    There is no Test scenario for SPAM updates. The selection you make here is ignored when importing a SPAM update.

    · Creating a backup

    Here you can determine if a backup copy of the customer objects, which are overwritten when applying patches, should be created.

    Note that creating a backup may take a long time, and furthermore may require a lot of disk space.

    A backup copy is not created with the SPAM update, since the SPAM transaction contains no objects to be modified by the customer that have to be backed up.

    · Run Generation

    This option lets you determine if the programs and screens delivered with the patches should be generated when applying the patch.

    Note that the generation can take a long time.

    If you do not choose Generation, the programs and screens are only generated when the are called for the first time. Note that you can only influence this parameter if generation is permitted by SAP for these patches during the patch application.

    You cannot influence generation for the SPAM update.

    SAP Global Settings

    Option

    Global Setting

    Transmission monitor

    Deactivated

    Scenario

    Default

    Creating a backup

    Deactivated

    Run Generation

    Deactivated

    Patch Types

    A patch corrects errors in the R/3 System or makes necessary adjustments, for example, due to legal changes. The objects affected are replaced in your system.

    Each patch is valid for only one release (but for all databases and operating systems) and has an exactly defined number of predecessors. The upgrade of the following release or correction release contains all the patches of the previous versions that were available up to the delivery of the upgrade.

    SPAM ensures that patches are applied only in the order dictated by the serial number.

    To avoid problems, apply every patch as soon as it is available. This keeps your system up-to-date.

    Use

    Here are the following patch types:

    • PAT

    This type denotes a SPAM update. This contains improvements and extensions of the SAP Patch Manager.

    Naming convention:

    SAPKD

    • HOT

    This type denotes a Hot Package. This contains a collection of correction for serious errors in Repository and Dictionary objects. The corrections are periodically assembled in Hot Packages and are announced in the OSS.

    Naming convention:

    SAPKH

    • LCP

    This type denotes a Legal Change Patch (LCP). However, like a Hot Package, this contains the same collection of correction for serious errors in Repository and Dictionary objects.

    It may also contain corrections and further adjustments due to legal changes for the SAP Human Resources (SAP HR) component. Unlike Hot Packages, LCPs are offered to all customers along with the SAP HR component.

    Naming convention:

    SAPKE

    • FFD

    This type denotes an FCS-Final Delta Patch (FFDP). An FFDP brings an FCS system to Final State status before Hot Packages or LCPs can be applied.

    Naming convention:

    SAPKDXX

    • CRT

    This type denotes a Conflict Resolution Transport (CRT). A CRT is exclusively used for add-ons, for example, IS-IS or IS-OIL. It resolves conflicts that can occur between a patch (Hot Package or LCP) and an add-on.

    Note that a CRT that is valid for an add-on release also resolves all conflicts with earlier releases from this add-on.

    Naming convention:

    SAPKI (SAP add-on)

    SAPKJ (Add-on from SAP partners)

    SAPKP Country adjustment

    • BWP

    This type denotes an SAP Business Warehouse Patch (BWP). This contains a collection of correction for the SAP Business Information Warehouse (SAP BW) component. BWPs also contain Basis corrections if they are needed. You can only apply BWPs in systems in which the (SAP BW) has been installed.

    Naming convention:

    SAPKH

    Authorizations for SPAM

    To use all the SPAM functions, you require the authorizations S_CTS_TR_ALL and S_CTS_ADMIN. You can find both of them in the authorization profile S_A.SYSTEM.

    If you log on in client 000 and your user master data contains the corresponding authorization profile, you can use all the functions of the SAP Patch Manager. If you log on in another client or without the correct user profile, you can only use the display functions.

    Only assign this authorization profile to the system administrator. Only the system administrator should have authorization for:

    • Downloading patches
    • Applying patches
    • Confirming successfully applied patches
    • Resetting the status of a patch

    Quick Guide to Patching your SAP System

    I need to upgrade our internal demo systems every once in a while. Now, as I don’t unleash my Basis skills on customers everyday I tend to forget how its done. I decided to record the steps here to save me a bit of time next time around. Please treat any advice given here with care(I’m no expert at this) and read the official guides and help files.

    Applying patches to an SAP system is not as simple as, say updating your Windows PC. There is no auto update or one click upgrade process. I will be surprised if there ever will be. The thing is, SAP actually allows you a lot of freedom and flexibility in changing the way it works(Windows doesn’t). The price you pay is a slightly complex upgrade process.

    Doing a full Support Pack update of an SAP system broadly involves the following:

    1. Log in to the Service Market Place and select the packages to be downloaded. Admittedly, this is a bit easier now with SP Stacks.

    2. Log on to your Solution Manager System(Maintenance Optimizer) to confirm your download basket. If you don’t do this you can’t download your Patches. I must still figure out what the benefit of this is.

    3. Download the files using the SAP Download Manager.

    4. Use sapcar to extract the patches. You can use the command sapcar -xvf from command line to do this. An easy way to extract these files in Windows is to register the extensions .CAR or .SAR to open automatically in Explorer.

    You can do this by opening Windows Explorer and going to Tools->Folder Options and clicking on the File Types Tab.

    Create a new type for the .CAR/.SAR file types and create a default action as shown in the screen shot below( Copy SAPCAR.EXE to your C:\Windows directory first).

    How to Download the supportpacks from servicemarket

    1) Login into the website https://websmp104.sap-ag.de/swdc using
    your userid and password

    2) Click on Downloads--->SAP Support Packages--->Entry by Application Group

    3) Click on SAP Application Components--->

    Choose products according to ur requirements

    SPAM Error

    DATA type "PAT03" was found in a newer version than required.

    oracle_SID not defined ENTER THE hkey_local_MACHINE -> SOFTWARE> ORACLE ORACLE_SID = PRD

    SAP Patch Manager (SPAM) PDF Free download

    SAP Patch Manager (SPAM)

    How to reinstall the Support Package Manager from the command line in SAP Basis

    1. Introduction
    As of SAP Basis Release 3.0D, SAP delivers Support Packages to remove any error that appears in important transactions. A Support Package is a bundle of corrections that fixes errors in the ABAP repository. They are available for download through the Software Distribution Centre at the SAP Service Marketplace (http://service.sap.com/PATCHES).

    Support Packages are installed using the so-called Support Package Manager (transaction SPAM). As with all software components, newer versions of the Support Package Manager are made available on a regular basis. Their installation processes might look strange at first sight. The old Support Package Manager, available in the system is used to install the new. During the procedure, the old one is replaced with the newer version.

    What if something went seriously wrong during the installation of the Support Package Manager? In a best-case-scenario, SPAM offers the option to re-start the installation. In a worst-case-scenario, the failure occurred during a critical phase of the installation process. The installation cannot be repeated, as the tool to install it is no longer there. A full database restore is an option, but not realistic. A database restore just to retrieve the Support Package Manager is a little bit too much to ask for.

    As an alternative, the Support Package Manager might be installed from the command line. This is what this tip is all about.

    2. Upload and disassemble the SPAM upgrade
    During the upload, the support package archive is copied to the transport directory. It is converted to a transport request during the disassemble process. The disassembling is automatically done when the support package is being installed. This cannot be done on the target system because transaction SPAM is no longer there.

    However, SAP systems which reside in the same system landscape share the transport directory. Another system can be used to upload and disassemble the SPAM package.
    1. Connect to one of the other SAP systems in your landscape. Remember, SPAM is operated from within client 000.
    2. From within the Support Package Manager, upload the SPAM archive from the front-end (in the menu 'Support Package' --> 'Load' -- > 'From the front-end').
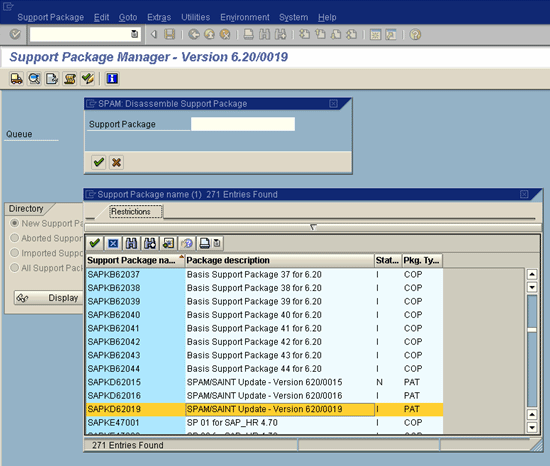
    3. Disassemble the Support Package. In the menu, go to 'Utilities', 'Disassemble Support Package'. Choose the SPAM archive and confirm.


    Figure 1: Transaction SPAM, disassemble the archive manually

    3. Install the Support Package Manager manually
    Install the Support Package Manager using the command line.

    1. As user adm, connect to the server.

    2. Open a DOS box or Telnet session.

    3. Go the transport directory:
    # cd H:\usr\sap\trans\bin

    4. Use tp to add the transport to the buffer:

    # H:\usr\sap\trans\bin>tp addtobuffer SAPKD62018  U1 pf=TP_DOMAIN_.PFL
    sapparam: sapargv( argc, argv) has not been called.
    sapparam(1c): No Profile used.
    sapparam: SAPSYSTEMNAME neither in Profile nor in Commandline
    This is tp version 340.15.01 (release 640)
    Warning: Parameter DBHOST is no longer used.
    Warning: Parameter DBNAME is no longer used.
    Addtobuffer successful for SAPKD62018
    tp finished with return code: 0
    meaning:
    Everything OK

    NOTE: The in TP_DOMAIN_.PFL is the of the Transport Domain Controller. This is not necessarily the same as the system into which you wish to import the SPAM transport request.

    5. Import the transport request:

    H:\usr\sap\trans\bin>tp import SAPKD62018  U26 pf=TP_DOMAIN_.PFL
    sapparam: sapargv( argc, argv) has not been called.
    sapparam(1c): No Profile used.
    sapparam: SAPSYSTEMNAME neither in Profile nor in Commandline
    This is tp version 340.15.01 (release 640)
    Warning: Parameter DBHOST is no longer used.
    Warning: Parameter DBNAME is no longer used.
    This is R3trans.exe version 6.09 (release 640 - 03.12.04 - 10:34:00).
    R3trans.exe finished (0004).
    sapevt.exe=>sapparam(1c): No Profile used.
    sapevt.exe=>sapparam(1c): No Profile used.
    sapevt.exe=>sapparam(1c): No Profile used.
    This is R3trans.exe version 6.09 (release 640 - 03.12.04 - 10:34:00).
    R3trans.exe finished (0004).
    sapevt.exe=>sapparam(1c): No Profile used.
    sapevt.exe=>sapparam(1c): No Profile used.
    sapevt.exe=>sapparam(1c): No Profile used.
    sapevt.exe=>sapparam(1c): No Profile used.
    tp finished with return code: 4
    meaning:
    A tool used by tp produced warnings
    6. In SAP, try transaction SPAM. Voila, after a few compiles the Support Package Manager reappears!